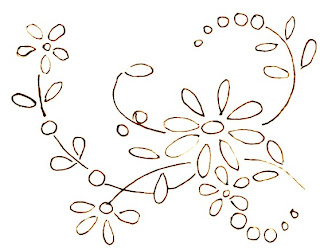
More Motifs
Here are two more motifs for you. These are from antique transfers and have an Asian flair. I've seen the one that looks like a fan often with variations on size and decoration. Just use simple stitches to outline and after adding lazy daisy stitches and beads, what could be easier?
Motif
Here is a motif I did for my whole cloth wallhanging (seen elsewhere in this blog.) I used 4mm and 7mm silk ribbon for the flowers and 4mm silk ribbon for the leaves - straight stitch for all. The stems are done using Portuguese stem stitch but a regular outline stitch is fine. I used 4 sizes of rose montees to finish. Tip: When doing flowers with straight stitch I always start my stitch at the outside and go in toward the center of the flower. To me, it always seems to make a neater looking flower.
Pansy Wallhanging
Some of you may have seen this in other venues, but where else should it be than on my own blog. This pansy wallhanging started out as a drawing less that 2" square and was charted and re-charted (is that a word?) several times until I had five petals to work on individually and in a large enough size to make it easy to handle. They were then assembled using the same chart, padded for dimension, and backed. I used several types of embellishment including application with Wonder Under, machine and hand embroidery, lace, ribbon embroidery and the beaded face was a gift to me from my friend Shirlee Fassell. I "dressed" it using dyed laces. A tip for you if you decide to do a shaped wallhanging: There is a piece of light weight lathe inside a casing that runs across the two upper petals to keep it hanging straight. It is actually hanging from two plastic rings sewn to the outside of the backing. I hope that you enjoy the photos and will feel free to write with questions if there's something that interests you.
Silk Ribbon Bellpull
This bellpull started out as a crazy quilt project and is actually pieced. I put so many flowers on it, I ended up wasting all of my piecing efforts. It would have looked the same if I had used one piece of fabric. Oh well, what can I say!! I just couldn't stop.
As you can probably guess, I enjoy making bellpulls. No bells on them though so I guess they should be called narrow wallhangings. As a help when you make these and other wallhangings, I would like to share with you how I do the backings.
Since crazy quilt projects are so heavily embellished, I like to finish them off in a way that I can go back at any time and do repairs if necessary. I've had to do this twice for beading that wasn't attached properly. I always do the backing in two pieces. I seam the two pieces together for 2-4 inches at the top and the bottom but just baste the seam in between this stitching. Press the seam open. With right sides together stitch the backing to your embellished project all around the four sides. (Your seam will be in the center.) Pull the thread out of the basted area, turn, and hand stitch the opening closed. Press your sides from the front so that you can work around the embellishments and to be sure the backing doesn't show from the front.
Round Robin Bellpull
Here are some photos of the lovely embellishment done on my bellpull which made it's way around in two wonderful round robins several years ago. Besides myself, the members of those round robins were Mary McRae, Genevieve Tracey, Betty Pillsbury, Shirlee Fassell, Laura Watson, Margaret Betz, Sandi Moran, Janie Jones, Michelle LaMothe, Sue Walters, Diane Foote, and Ena Flynn. The round robins were called Color Play 1 and 2. Everyone had a great time and the results were among the best of any I've seen. It would be nice to see some of the other finished pieces.
Whole Cloth Crazy Quilt - A Misnomer - Part 5
In an earlier blog I mentioned that the saga of my large fan may have to be revisited. Well, it does!! The painted one was too "washed out" looking to use on this wallhanging. I'll just count it as an experience in painting with Shiva paint sticks and store it away. Maybe I'll need it some day for another project...Yeah, Right!!!
I decided to do a larger version of the two small fans using the same thread color for the fern stitch outlines. I redid the cherry blossom design so that there was a little less to embroider. This time I did them in silk ribbon (in this photo, I still haven't done the centers.) The branch and leaves were done using silk thread and regular embroidery stitches.
You'll see all these parts pull together soon in my finished wallhanging.
Whole Cloth Crazy Quilt - A Misnomer - Part 4
These fans will go in the upper corners of my wallhanging. I made them as mirror images of each other as I thought having them done with different embroidery and/or colors would be much too much going on with crazy quilt stitches all around. They will be padded with fleece and stitched down using the fern stitch and the same thread that surrounds the flowers. I'd like to thank Carole Samples for unknowingly guiding me toward the design I used. I was thinking about how I wanted to do the fans one morning and that same day I got an email from Miss Carole directing me to an antique crazy quilt on eBay. The design was right there in front of me when I clicked on the link. Perfect!!
French knots, straight stitch, and fern stitch were the only stitches I used throughout. The original had another flower design in the middle and a larger variety of stitches were used. Have fun with it. It's such a beautiful design.
Motifs - 3
This embellishment was one I did for one of the squares in the Winter/Christmas round robin I was in last year.
The vintage holly motif was embroidered using a satin stitch for the berries and an outline stitch for around the leaves. I then painted in the leaves using Shiva paint sticks. This is the first time I've used these paints on someone else's work but I like the way it makes the holly look as if it's just lying on top. It took some effort to get the colors deep enough. I had a nice, large winter print waiting in the wings if I messed up the paint...Whew!!
Since Christmas calls for Poinsettia, I thought the introduction of some silk ribbon would be pretty. I got the pattern and instructions from The Silk Ribbon Embroidery Bible by Joan Gordon. I did have to reduce the sizes of the pattern on the computer in order for them to fit in the area I wanted them. A few sprigs of evergreens finished it off.
I did a seam using some flower-shaped sequins with beads in the center, some red beads to beef up the little green plaid fabric, and then added a Susan Clarke hand painted Santa.
Whole Cloth Crazy Quilt - A Misnomer - Part 3
It's hard to know how to label these posts so that you can follow the progression. Just look for "Whole Cloth Crazy Quilt" in the list to the right to see different aspects. I have put Part 2, 3, etc. to show you the order to follow. I work on so many things during a week, back and forth, back and forth, I get overwhelmed sometimes with the ideas swirling around in my head. Sick, sick, sick!!
Painting on crazy quilts: Many of the oldest crazy quilts I've seen have some motifs that are colored by painting. I've tried many of the ones on the market today in very small areas on some of my projects. Most of them work ok but running can be a problem when working with some of them. Who wants to spend hours piecing and then lose control of a liquid paint?!
Last year I purchased several colors of the Shiva paintsticks. These are oil paint in a solid form and are in the shape of a really fat crayon. They have a film that forms over them that has to be removed every time you use them, but serves to protect them from completely drying out in between uses. They are meant to last for years. I was not having a lot of luck with them as there are very few instructions available except for using the large templates that you can buy to make overall designs on fabrics. This was not up my alley. The paint is in a solid form so finding brushes with stiff enough bristles is not easy. I even used the smallest size stencil brush I could find - too big!
Before I continue, here is some Important Information you should have before you paint. Always try the paint on a scrap of the fabric you are going to be using in your finished project. The paint works better on some fabrics than it does on others. You can paint most fabrics but it's the density of color that is the problem (for me anyway.) Sometimes all you need to do is change the color to get a good result.
My first try: A couple of my friends and I did some experimenting with the paints recently and have found a technique that we thought was super easy. Got cheap toothpicks???!!! The ones with the flat end work. Just take a little paint on a toothpick, set it on the area you want to cover, use the flat end of the toothpick, and spread the paint out. Then you can use a regular brush to smooth over the area.
Here are photos of two motifs and a fan I used paint sticks on along with a line drawing of each for you to use as desired.
Motif 1) I used a backstitch to outline this butterfly in gold metallic thread and added a little red metallic thread to the inside of the wings to set apart some areas. Then I painted inside the red areas with metallic gold Shiva. I will add beads later.
Motif 2) I used the outline stitch to make the flower and was going to use satin stitch on it. The Shiva paint was easier and quicker. I used three colors in the leaves including gold to highlight them and pink paint with red on top for the petals. The two colors blended together nicely by rubbing the red into the pink with the flat end of a toothpick. I will add a few beads later.
My large fan) Here is a series of photos showing the fan that I designed for my wallhanging. Trying to find a picture of cherry blossoms I thought I could use (which I felt I absolutely had to have) was not as easy as I thought it would be. I finally bought a book with royalty free drawings and changed it to fit my fan area. I'm pretty good at drawing simple things but surely am not an artist. I used transfer paper to trace it onto my fabric which is a black synthetic material with a smooth and shiny surface. Painting turned out to be easier this time (I think it was because of the smooth surface.) Because the area was so large, I probably would have given up easily if it had not been. This time, I used a palette knife and shaved the paints off onto a glass plate and mashed and mixed until the paint was smooth. I mixed in a colorless blender (also available as a Shiva paint stick) whenever I wanted to mix two colors together. I used a small stencil prush and a regular paint brush (for smaller areas) to apply the paint. It came out a lot lighter than I was aiming for but I really like the result. I will have to see it actually on my wallhanging before I decide if it will stay, however. The threads used in the wallhanging are very vibrant and this fan may have to be redone so that it looks right. This fan "saga" may not be over - we'll see!! I am going to use a twin needle with black thread to make the "veins" for the fan.
There are so many places selling these paint sticks at discounts online that I don't find it worth my while to stock them. Buy some and give it a try. It's really a lot of fun!
Painting on crazy quilts: Many of the oldest crazy quilts I've seen have some motifs that are colored by painting. I've tried many of the ones on the market today in very small areas on some of my projects. Most of them work ok but running can be a problem when working with some of them. Who wants to spend hours piecing and then lose control of a liquid paint?!
Last year I purchased several colors of the Shiva paintsticks. These are oil paint in a solid form and are in the shape of a really fat crayon. They have a film that forms over them that has to be removed every time you use them, but serves to protect them from completely drying out in between uses. They are meant to last for years. I was not having a lot of luck with them as there are very few instructions available except for using the large templates that you can buy to make overall designs on fabrics. This was not up my alley. The paint is in a solid form so finding brushes with stiff enough bristles is not easy. I even used the smallest size stencil brush I could find - too big!
Before I continue, here is some Important Information you should have before you paint. Always try the paint on a scrap of the fabric you are going to be using in your finished project. The paint works better on some fabrics than it does on others. You can paint most fabrics but it's the density of color that is the problem (for me anyway.) Sometimes all you need to do is change the color to get a good result.
My first try: A couple of my friends and I did some experimenting with the paints recently and have found a technique that we thought was super easy. Got cheap toothpicks???!!! The ones with the flat end work. Just take a little paint on a toothpick, set it on the area you want to cover, use the flat end of the toothpick, and spread the paint out. Then you can use a regular brush to smooth over the area.
Here are photos of two motifs and a fan I used paint sticks on along with a line drawing of each for you to use as desired.
Motif 1) I used a backstitch to outline this butterfly in gold metallic thread and added a little red metallic thread to the inside of the wings to set apart some areas. Then I painted inside the red areas with metallic gold Shiva. I will add beads later.
Motif 2) I used the outline stitch to make the flower and was going to use satin stitch on it. The Shiva paint was easier and quicker. I used three colors in the leaves including gold to highlight them and pink paint with red on top for the petals. The two colors blended together nicely by rubbing the red into the pink with the flat end of a toothpick. I will add a few beads later.
My large fan) Here is a series of photos showing the fan that I designed for my wallhanging. Trying to find a picture of cherry blossoms I thought I could use (which I felt I absolutely had to have) was not as easy as I thought it would be. I finally bought a book with royalty free drawings and changed it to fit my fan area. I'm pretty good at drawing simple things but surely am not an artist. I used transfer paper to trace it onto my fabric which is a black synthetic material with a smooth and shiny surface. Painting turned out to be easier this time (I think it was because of the smooth surface.) Because the area was so large, I probably would have given up easily if it had not been. This time, I used a palette knife and shaved the paints off onto a glass plate and mashed and mixed until the paint was smooth. I mixed in a colorless blender (also available as a Shiva paint stick) whenever I wanted to mix two colors together. I used a small stencil prush and a regular paint brush (for smaller areas) to apply the paint. It came out a lot lighter than I was aiming for but I really like the result. I will have to see it actually on my wallhanging before I decide if it will stay, however. The threads used in the wallhanging are very vibrant and this fan may have to be redone so that it looks right. This fan "saga" may not be over - we'll see!! I am going to use a twin needle with black thread to make the "veins" for the fan.
There are so many places selling these paint sticks at discounts online that I don't find it worth my while to stock them. Buy some and give it a try. It's really a lot of fun!
Motifs - 2
This leaf design is from an antique lace appliqué. Use an outline stitch on all lines shown and fill in open areas with beads and/or embroidery stitches.
1 - Herringbone Stitch, 2 - Fly Stitch, 3 - Lazy Daisy Stitch, 4 - Bead placement is shown by circles. Also place one bead in the center of the three lazy daisy stitches.
Happy Easter in Crazy Quilt
Motifs
I use a lot of vintage embroidery motifs as well as design my own. I will try to share them in a way that you can utilize them yourself. As I do one I think you might like, I'll give you a drawing to download along with the names of the stitches I used. Along with silk ribbons, I always use lightweight threads up to a size 12 perle cotton. That's my personal preference, but don't limit yourself if you prefer a heavier, bolder look. This first one is for a square for a round robin with the theme of Autumn. The flower stems are done with a split stitch with fern stitch foilage. The flower petals are bullion stitches with tiny seed beads for centers. Oh yeah, did I mention, I like quick and easy!!?
Whole Cloth Crazy Quilt - A Misnomer - Part 2
Black Bellpull
Subscribe to:
Posts (Atom)